Flex Tree with variable height item renderers
Creating a Flex Tree with variable height rows can be mysteriously difficult if you are new to Flex item renderers. This cookbook will give you the step by step instructions to creating a Tree control with variable height renderers.
First you will need to define your tree component:
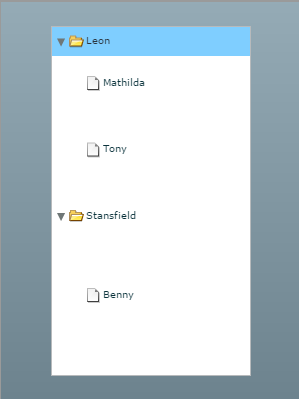
<mx:Tree itemRenderer="{new ClassFactory(CustomTreeItemRenderer)}" labelField="@name" showRoot="false" variableRowHeight="true" width="200" height="350">
  <mx:XMLListCollection id="Characters">
   <mx:XMLList>
    <movie>
     <main name="Leon" height="25">
      <sub name="Mathilda" height="50"/>
      <sub name="Tony" height="75"/>
     </main>
     <main name="Stansfield" height="50">
      <sub name="Benny" height="100"/>
     </main>
    </movie>
   </mx:XMLList>
  </mx:XMLListCollection>
 </mx:Tree>
Notice that the tree control has the attribute “variableRowHeight” set to true. This is very important since it will allow all of the rows to be a different height. We also set our data provider to have names which will be used as our renderer’s label and heights which will be used to resize each renderer.
The next most important attribute here is the “itemRenderer” which is defined as new ClassFactory(CustomTreeItemRenderer). This means that we will be using a component called the CustomTreeItemRenderer as our itemRenderer.
Now, we must create the CustomTreeItemRenderer. This will extend the TreeItemRenderer and will override two methods:
- measure
- updateDisplayList
The measure method simply measures all of the components within the renderer and sets their heights and widths. Below we can see what our code must do:
override protected function measure():void{
    super.measure();
    //Check to make sure the data is initialized
    if(data && data.@height > 0){
        this.measuredHeight = data.@height;
    }
}
Above, you can see that the code is simply setting the measuredHeight of our renderer to the height that was defined in our tree’s data provider above. The @ sign in from of the height attribute is used since we are extracting data from our XML based dataprovider rather than an Object based dataprovider.
Now, that the height is set, we need to override the updateDisplayList method so that we can correctly layout out newly resized component.
override protected function updateDisplayList(unscaledWidth:Number,
                                                      unscaledHeight:Number):void{
    super.updateDisplayList(unscaledWidth, unscaledHeight);
    //Check to make sure the data is initialized
    if(data && data.@height > 0){
        //put the label at the correct y coordinate based on the height
        label.y = (data.@height / 2) - (label.measuredHeight /2);
    }
}
We can see in the code above, that we are setting the label’s y coordinate based on the new height of the renderer. This is necessary in order to vertically align our label within the new larger renderer.
That’s it. We now have Flex Tree with variable height rows!
See the sample below which will allow you to download the source by right clicking:
 admin
admin